Set up Microsoft Entra ID (Azure AD) for SCIM provisioning
Configure Microsoft Entra ID to push user accounts into TraffiTech over SCIM 2.0 so new hires, attribute changes, and deactivations are synced automatically.
This guide assumes SSO is already working - see the Microsoft Entra ID SSO guide first.
Prerequisites
Obtain the following from your TraffiTech administrator:
- Tenant URL - the full SCIM endpoint for your IdP, with the recommended
?aadOptscim062020flag appended (see Step 2), in the form:https://oidc.traffitech.com/scim/v2/enterprise-idps/{provider_id}?aadOptscim062020 - Secret Token - the bearer token Entra ID will use to authenticate against TraffiTech
Your administrator generates both values after your IdP is registered in TraffiTech.
Step 1: Create an Enterprise Application in Entra ID
- Open the Microsoft Entra admin center and expand Entra ID in the left sidebar, then select Enterprise apps.
- (Alternative: in the Azure Portal, go to Microsoft Entra ID → Manage → Enterprise applications.)
- Click New application → Create your own application.
- Enter a name (e.g.
TraffiTech SCIM). - Select Integrate any other application you don't find in the gallery (Non-gallery).
- Click Create.
Entra ID requires a separate application for SCIM provisioning from the one used for SSO. SSO is configured under an App registration (which has a corresponding enterprise app, but no Provisioning blade); SCIM provisioning has to be configured on a dedicated non-gallery Enterprise application created here. Don't try to reuse the SSO app. The Provisioning option won't be available on it.
Step 2: Configure Provisioning
-
In the enterprise application, under Manage in the left sidebar, select Provisioning.
-
On the provisioning page, under Manage in the left sidebar, select Provisioning again - this opens the provisioning configuration form.
-
Set Provisioning Mode to Automatic.
-
Expand Admin Credentials and fill in:
-
Authentication Method: Bearer Authentication
-
Tenant URL - paste the URL from your TraffiTech administrator, with
?aadOptscim062020appended (recommended), for example:https://oidc.traffitech.com/scim/v2/enterprise-idps/{provider_id}?aadOptscim062020 -
Secret Token - paste the bearer token from your TraffiTech administrator
noteWe recommend always appending
?aadOptscim062020to the Tenant URL. The flag opts Entra ID into its post-June-2020 SCIM 2.0 compliance fixes (booleanactivevalues, standards-compliant multi-valued PATCH operations). Without it, Entra ID sends legacy payload shapes that can cause 400 errors on multi-valued PATCH operations (e.g.emails,phoneNumbers) oractivetoggles.See Microsoft's SCIM compatibility reference for the full list of flags.
warningRe-paste the Secret Token whenever you change the Tenant URL. The Secret Token field is write-only - after a save the portal shows only a placeholder dot and never puts the saved token back into the form. If you edit the Tenant URL (for example to append
?aadOptscim062020to an existing configuration) and click Test Connection without re-entering the token, the portal submits the form as-is and Entra ID falls back to a token of its own, which TraffiTech rejects with 401 "Invalid bearer token" - even though the URL and the saved token are both fine. Always re-paste the bearer token in the same edit session before clicking Test Connection, then Save. -
-
Click Test Connection - Entra ID will send a request to verify connectivity.
-
Click Save at the top of the page.
Step 3: Configure attribute mappings
- In the Provisioning section, expand Mappings.
- (Alternative: under Manage in the left sidebar, click Attribute mapping.)
- Click Provision Microsoft Entra ID Users.
- Review the default attribute mappings. The standard mappings TraffiTech supports:
| SCIM attribute | Azure AD attribute |
|---|---|
externalId | objectId |
userName | userPrincipalName |
emails[type eq "work"].value | mail |
displayName | displayName |
name.givenName | givenName |
name.familyName | surname |
phoneNumbers[type eq "work"].value | telephoneNumber |
urn:ietf:params:scim:schemas:extension:enterprise:2.0:User:employeeNumber | employeeId |
active | Switch([IsSoftDeleted], , "False", "True", "True", "False") |
-
Delete any mappings you don't need (e.g.
preferredLanguage,addresses). If you need to sync attributes beyond the standard set above, contact your TraffiTech administrator so they can register them on the TraffiTech side. You can also check the Adding custom attribute mappings section below. -
Repoint
externalIdtoobjectId. Microsoft's default mapsexternalIdtomailNickname, butmailNicknameis mutable and reusable -objectIdis the only Entra attribute guaranteed to remain stable for the lifetime of a user. Click Edit on theexternalIdrow, change Source attribute toobjectId, then click OK. -
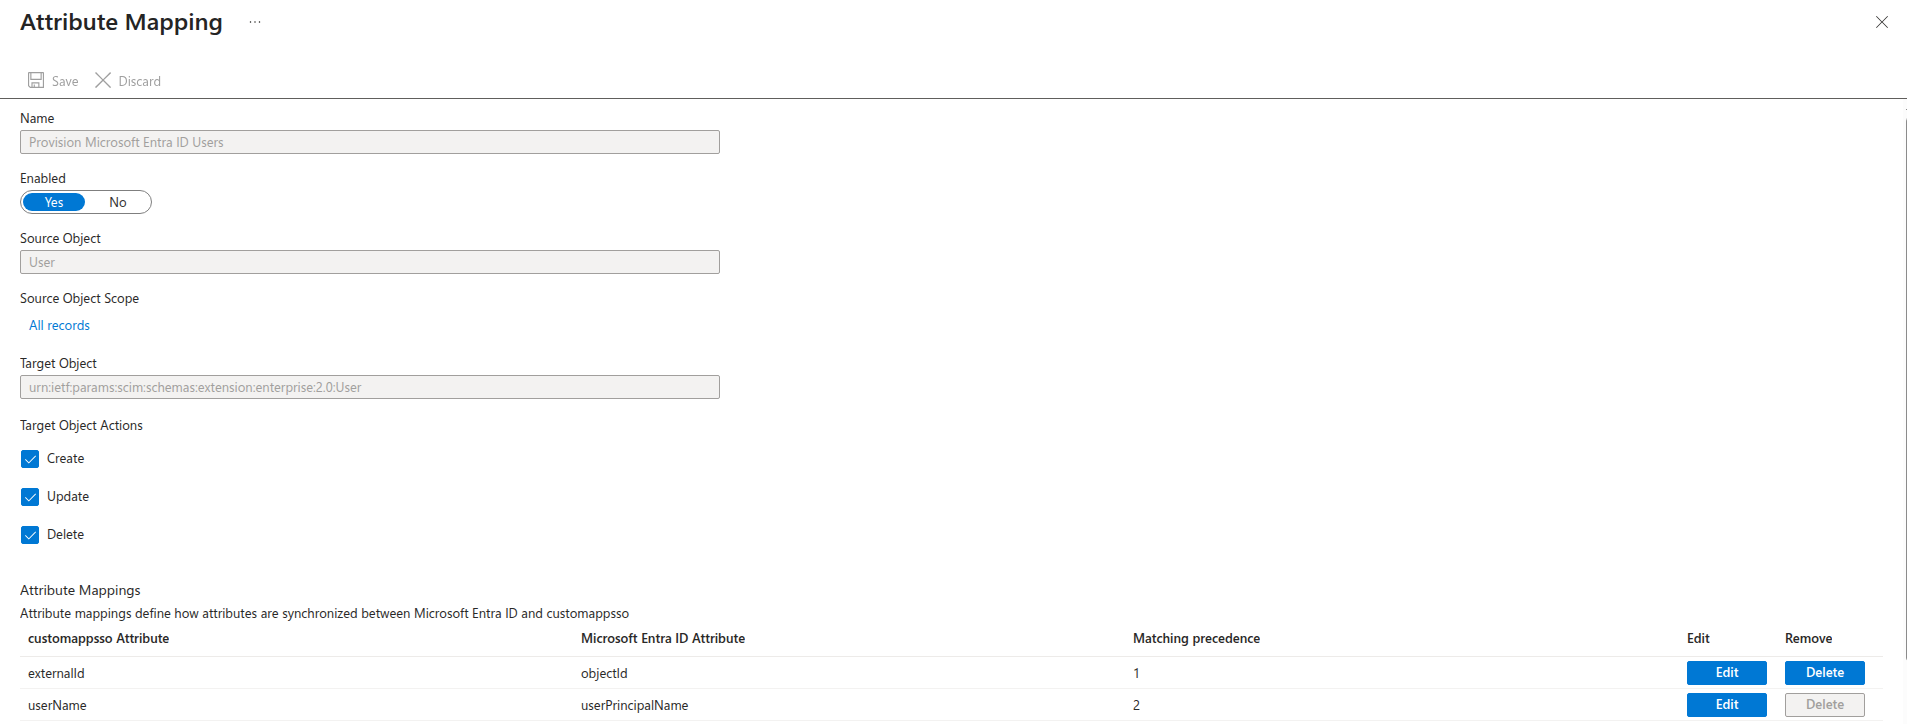
Configure user matching. So Entra updates existing users instead of creating duplicates, set the matching precedence on two attributes. For each row below, click its Edit button, switch Match objects using this attribute to Yes, set Matching precedence to the listed value, then click OK:
SCIM attribute Matching precedence externalId1 userName2 warningFree up Matching precedence
1before assigning it toexternalId.userNameships with Matching precedence1by default, so configureuserNamefirst (change it to2) to release the slot. If you try to setexternalIdto1whileuserNamestill holds it, Entra blocks the save with "Enter a number that is not used as the Matching Precedence in your other mappings."The Attribute Mappings section should now look like this:
-
Click Save.
-
Close the Attribute Mapping pane using the X in the upper-right corner to return to the Provisioning screen.
Adding custom attribute mappings
If your organization needs to sync attributes that aren't in the standard table - for example org hierarchy, team, or region codes - register them under the TraffiTech extension schema URN (urn:ietf:params:scim:schemas:extension:traffitech:2.0:User:):
- At the top of the attribute mapping page, check Show advanced options.
- Click Edit attribute list for customappsso.
- Add each custom attribute your integration needs, prefixed with the TraffiTech extension URN, for example:
| Name | Type |
|---|---|
urn:ietf:params:scim:schemas:extension:traffitech:2.0:User:jobCode | String |
urn:ietf:params:scim:schemas:extension:traffitech:2.0:User:companyId | String |
urn:ietf:params:scim:schemas:extension:traffitech:2.0:User:companyName | String |
- Click Save.
- Add mappings from your Azure AD directory extensions or custom attributes to these new SCIM attributes.
Always register custom attributes under the TraffiTech URN. Entra ID has a known schema-matching issue where custom attributes added with bare names (e.g. just jobCode) land in the internal customappsso namespace and are omitted from the initial POST /Users payload - newly-provisioned users arrive without those values, and only later PATCH cycles backfill them. URN-namespaced attributes are serialized under the declared extension schema and arrive correctly on the first POST.
Confirm with your TraffiTech administrator that the same custom attributes are registered on the TraffiTech side before enabling provisioning, otherwise the values arrive but are discarded.
Cleared attributes are not propagated. This is by-design behavior in Entra ID, confirmed by Microsoft: when a value is cleared on a user in Entra (e.g. a phone number removed, a title emptied), Entra does not send any SCIM request for that change - no PATCH with op: "remove", null, or "". The attribute is simply omitted from subsequent PATCH payloads, per Entra's SCIM rule "if a value isn't present, don't send null values". The old value therefore remains in TraffiTech.
To remove a value from TraffiTech you have two options:
- Re-provision the user - unassign and re-assign the user to the enterprise app in Entra. This triggers a fresh
POSTwith the current (cleared) state. - Clear it manually in TraffiTech, via the admin console or directly through the API.
References:
Step 4: Configure scope (who gets provisioned)
- Go to Manage → Provisioning → Settings.
- Under Scope, choose one of:
- Sync only assigned users and groups (recommended) - only users and groups assigned to this enterprise app are provisioned.
- Sync all users and groups - provisions your entire directory. Use with caution.
- If you changed the scope, click Save at the top of the page.
- If using assigned users/groups:
- Go to Manage → Users and groups in the left sidebar.
- Click Add user/group.
- Select the users or groups to provision.
TraffiTech supports only user provisioning, group objects are not synced. You can still assign groups to the enterprise app as a convenient way to control which users get provisioned (every member of an assigned group is provisioned as a user), but the groups themselves won't appear in TraffiTech and group memberships aren't mirrored.
Step 5: Enable provisioning
- Go to Manage → Provisioning → Settings.
- Set Provisioning Status to On.
- Click Save at the top of the page.
Entra ID performs an initial cycle (full sync) which can take several minutes to hours depending on the number of users. Subsequent incremental cycles run roughly every 40 minutes and only sync changes.
Step 6: Monitor provisioning
- In the enterprise application, under Monitor in the left sidebar, select Provisioning logs to see individual operation results per user.
- If you see errors, check the message in the log entry. It usually identifies the attribute or permission at fault.
- For anything that looks server-side (repeated 4xx/5xx responses, quarantine status), contact your TraffiTech administrator with the timestamp and affected
mail.
Common issues
| Symptom | Likely cause | Fix |
|---|---|---|
| Test Connection fails with 401 | Invalid or expired Secret Token | Ask your TraffiTech administrator to issue a new token and paste it into Entra ID |
Test Connection fails with 401 right after editing the Tenant URL (e.g. appending ?aadOptscim062020) | The Secret Token field is write-only - once the Admin Credentials form is edited, the portal no longer sends the saved token and Entra ID falls back to a self-issued token | Re-paste the Secret Token in the same edit session, then Test Connection and Save - see the warning in Step 2 |
| Test Connection fails with 403 | SCIM not enabled on the IdP in TraffiTech | Ask your TraffiTech administrator to enable SCIM for your IdP |
| Test Connection fails with 404 | Wrong Tenant URL (incorrect provider_id) | Re-copy the Tenant URL from your TraffiTech administrator |
| Users created but missing attributes | Attribute mappings not configured in Entra ID, or custom attribute not registered on the TraffiTech side | Verify the mapping list above, and ask your administrator to confirm custom attributes are registered |
| Newly created users missing custom extension attributes | Entra auto-provisioning omits custom extensions from the initial POST (Microsoft-confirmed schema-matching issue) | Run Provisioning → Provision on demand for the affected user to force a full-payload request |
| "Insufficient scope" errors (403) on some operations | Secret Token was issued without all required scopes | Ask your TraffiTech administrator to re-issue the token with full scopes |
| Quarantine status on the Provisioning blade | Too many failures in the initial cycle | Check Provisioning logs, resolve the root cause, then resume provisioning from Entra ID |
400s on multi-valued PATCH (emails, phoneNumbers) or active toggles | Tenant URL is missing the recommended ?aadOptscim062020 flag, so Entra ID sends pre-June-2020 SCIM payload shapes | Append ?aadOptscim062020 to the Tenant URL as shown in Step 2, see Microsoft's SCIM compatibility reference |
| Cleared attribute in Entra ID not cleared in TraffiTech | Entra omits cleared attributes from PATCH instead of sending op: remove | Re-assign the user to the app (triggers a fresh POST) or wait for the next initial-cycle resync - see the warning under Step 3 |
SCIM operations Entra ID sends
Useful when debugging what Entra ID is actually doing:
| Event | SCIM operation | When |
|---|---|---|
| User assigned to app | POST /users | User or group member added |
| User attribute changed | PATCH /users/{id} | Name, email, title, etc. updated in Entra ID |
| User soft-deleted | PATCH /users/{id} with active: false | User removed from app assignment or soft-deleted in Entra ID |
| User hard-deleted | DELETE /users/{id} | User permanently deleted from Entra ID |
| User restored | PATCH /users/{id} with active: true | User re-assigned to the app |
| Initial sync | GET /users?filter=... then POST for each | First provisioning cycle |
| Incremental sync | GET /users?filter=... then PATCH for changes | Every ~40 minutes |
Entra ID uses PATCH (not PUT) for updates. The most common PATCH operations toggle active or update displayName, name.*, emails, and phoneNumbers.
Appendix: example Tenant URL
https://oidc.traffitech.com/scim/v2/enterprise-idps/ed6548d3-2159-4c28-b160-11095bd8cf6d?aadOptscim062020
The provider_id segment (the UUID) identifies your IdP inside TraffiTech - your administrator will give you the exact URL to paste into Entra ID. The ?aadOptscim062020 suffix is the recommended Entra ID compliance flag from Step 2.